
SONY Study Notes
Published:
SONY学习笔记

Prompt Engineering
- Qwen + LLM Agent + ReAct Prompting ReAct 框架允许 LLMs 与外部工具交互来获取额外信息,从而给出更可靠和实际的回应。 Prompt:
- Thought: 思考推理,其实就是做planning。
- Action:其实就是做行动,决定使用什么工具
- Action Input:工具输入
- Observation:工具输出
messages = [
    {
        "role": Role.SYSTEM,
        "content": "You are an embodied AI assistant that controls a robot and interacts with the user.",
    },
    {"role": Role.USER, "content": "The robot are in an environment that "+circumstance+", Please reply 'Robot already knows the basic environment aorund robot' "},
]
response = Generation.call(
        # Generation.Models.qwen_max,
        model="qwen-max-1201",
        messages=messages,
        result_format="message",  # set the result to be "message" format.
        stop_tokens=stop,
        temperature=0.05,
    )
print(response.output.choices[0]['message']["content"])

messages.append({"role": Role.USER, "content": prompt_1})
def tool_wrapper_for_qwen(tool): def tool_(query): query = json.loads(query) return tool(**query) return tool_TOOLS = [ { "name_for_human": "search_object", "name_for_model": "search_object", "description_for_model": "Robot will get the location of queried object at the robot's current location. The location is described by x and y coordinates.", "parameters": [ { "name": "object_name", "type": "string", "description": "the name of object to search", "required": True, } ], "tool_api": tool_wrapper_for_qwen(search_object), }, ] Chatgpt(Azure OpenAI)
import os
from openai import AzureOpenAI

client = AzureOpenAI(
    azure_endpoint=os.getenv("AZURE_OPENAI_ENDPOINT"),
    api_key=os.getenv("AZURE_OPENAI_KEY"),
    api_version="2023-05-15",
)

response = client.chat.completions.create(
    model="robot",  # model = "deployment_name".
    messages=[
        {"role": "system", "content": "You are a helpful assistant."},
        {"role": "user", "content": ""},
    ],
)

print(response.choices[0].message.content)
print(response.usage)
参考链接
https://zhuanlan.zhihu.com/p/631922240 https://www.promptingguide.ai/zh/introduction/tips
- Zero-shot prompt: 零样本的prompt。此为最常见的使用形式。之所以叫zero-shot,是因为我们直接用大模型做任务而不给其参考示例。这也被视为评测大模型能力的重要场景之一。
- Few-shot prompt: 与zero-shot相对,在与大模型交互时,在prompt中给出少量示例。
- 使用KNN等近邻算法去选择与test样本距离更近的few-shot example;
- 随机使用few-shot example;
- 使用强化学习或主动学习去进一步选择few-shot example。
- Role prompt: 与大模型玩“角色扮演”游戏。让大模想象自己是某方面专家、因而获得更好的任务效果。
- Instruction prompt: 指令形式的prompt。
- Chain-of-thought prompt: 常见于推理任务中,通过让大模型“Let’s think step by step”来逐步解决较难的推理问题。
- Multimodal prompt: 多模态prompt。顾名思义,输入不再是单一模态的prompt,而是包含了众多模态的信息。如同时输入文本和图像与多模态大模型进行交互。
Grounded-Segment-Anything
detections = grounding_dino_model.predict_with_classes(
        # image=cv2.cvtColor(image, cv2.COLOR_RGB2BGR),
        image=image,
        classes=det_cls,
        box_threshold=BOX_THRESHOLD,
        text_threshold=BOX_THRESHOLD,
    )
Feeding scene detects objects detections.xyxy:表示检测到的目标框坐标,是一个 N 行 4 列的数组,每行代表一个目标框的坐标信息(左上角和右下角的 x、y 坐标)。
detections.confidence:表示目标框的置信度,是一个 N 行 1 列的数组,每行代表一个目标框的置信度。
detections.class_id:表示目标框的类别标识,是一个 N 行 1 列的数组,每行代表一个目标框的类别。
for box in xyxy:
        masks, scores, logits = sam_predictor.predict(box=box, multimask_output=True)
        index = np.argmax(scores)
        result_masks.append(masks[index])
Flask 封装 API
@app.route("/<image_path>/<text>", methods=["GET"])
def locate_object(image_path, text):
    image_path = urllib.parse.unquote_plus(
        image_path
    )  # Decode the URL of the image path
    print("object: " + text)
    image = cv2.imread(image_path)
    image = cv2.cvtColor(image, cv2.COLOR_BGR2RGB)
    annotated_image, centroid_x, centroid_y = grounded_sam(image, text)
    response_data = {"x": centroid_x, "y": centroid_y}
    return jsonify(response_data)
resp = requests.get(LOCATE_OBJECT_API, timeout=15)
content = json.loads(resp.content)
Flask不允许返回None
参考链接
https://www.cnblogs.com/cleven/p/10858016.html#d
https://zhuanlan.zhihu.com/p/137649301
gradio (很好用)
import gradio as gr
demo = gr.Interface(
    fn=grounded_sam,
    inputs=["image", "text"],
    outputs=["image", "text", "text"],
)
if __name__ == "__main__":
    demo.launch()
computer vision 三维重建
世界坐标->相机坐标->图像坐标->像素坐标
- 空间点(摄像机坐标系)到像素平面
- 空间点到像平面 相似三角形
- 像平面到像素平面
- 偏置 坐标系从中心移到左上角
- 单位变换 k,l分别是横纵坐标的pixel/m
\(P = (x,y,z) \rightarrow P^{'}=(f*k*\frac xz+c_x,f*l*\frac yz+c_y)\) \(\alpha=f*k ;\beta=f*l\) 转换成映射关系(利用齐次坐标): \(P_h^{'}=\left[ \begin{matrix} \alpha x+c_xz\\ \beta y+c_yz \\ z \end{matrix} \right]= \left[ \begin{matrix} \alpha & 0 & c_x & 0\\ 0 & \beta & c_y & 0 \\ 0 & 0 & 1 &0 \end{matrix} \right] \left[ \begin{matrix} x\\ y \\ z\\ 1 \end{matrix} \right]\) 如果考虑摄像机偏斜: \(P^{'}=\left[ \begin{matrix} \alpha & -\alpha +\cot\theta & c_x & 0\\ 0 & \beta/sin\theta & c_y & 0 \\ 0 & 0 & 1 &0 \end{matrix} \right]\left[ \begin{matrix} x\\ y \\ z\\ 1 \end{matrix} \right]=K[I 0]P=MP\) K:内参数矩阵,M:投影矩阵(摄像机坐标系到像素坐标)五个未知参数
- 世界坐标系到像素平面
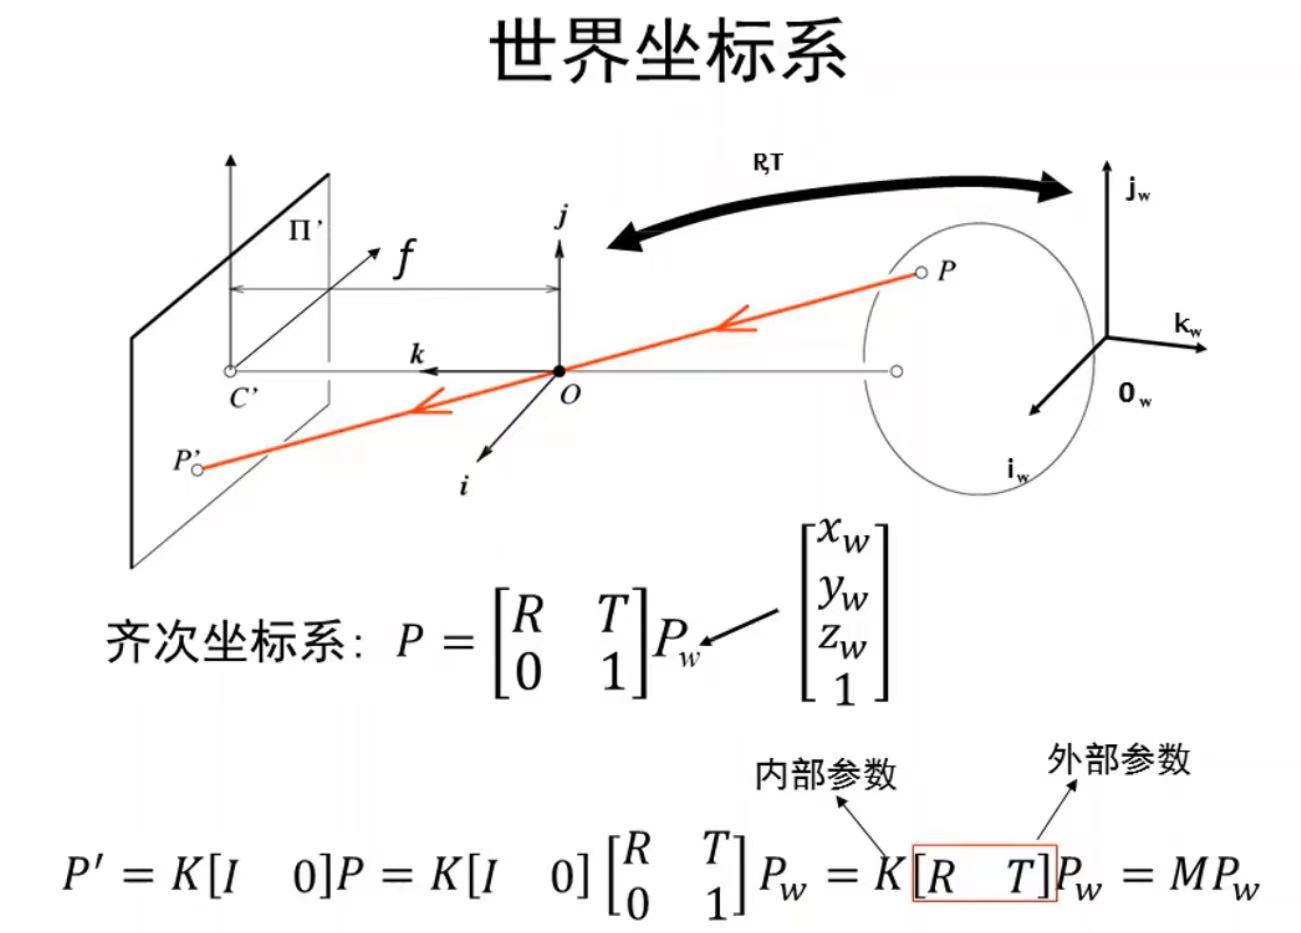 相机的外参也被称为旋转平移矩阵,包括xyz三个轴的旋转参数,即旋转矩阵(R矩阵)。还有三个轴的平移参数,也就是平移矩阵(T矩阵)。 \(P^{'}=\left[ \begin{matrix} m_1\\ m_2 \\ m_3 \end{matrix} \right]_{3X4}P_w\rightarrow E(\frac{m_1P_w}{m_3P_w},\frac{m_2P_w}{m_3P_w})\)M:11个未知参数
世界坐标->相机坐标->图像坐标->像素坐标
2D变换
DOF:等距变换(3)、相似变换(4)、仿射变换(6)不变量:平行线、面积比值、射影变换(8)不变量:共线性、四共线点交比。
由于三维转二维的时候标定板就是直接设标定板到相机的距离为0,即z轴为0,因此,在二维图像坐标转化到三维世界坐标中我们也可以设置其中一个维度为已知的一个量,即Zc是可以求到的。在Zc已知的情况下才能进行像素到世界坐标的转换。由下转换公式也可证明这点。
\[\left[ \begin{matrix} x_c\\ y_c \\ z_c\\ 1 \end{matrix} \right]= \left[ \begin{matrix} \alpha & 0 & c_x & 0\\ 0 & \beta & c_y & 0 \\ 0 & 0 & 1 &0 \end{matrix} \right]^{-1} \left[ \begin{matrix} u \\ v \\ 1 \end{matrix} \right]\] \[\left[ \begin{matrix} x\\ y \\ z\\ 1 \end{matrix} \right]= \left[ \begin{matrix} R & T\\ 0 & 1 \end{matrix} \right]^{-1} \left[ \begin{matrix} x_c\\ y_c \\ z_c\\ 1 \end{matrix} \right]= \left[ \begin{matrix} R & T\\ 0 & 1 \end{matrix} \right]^{-1} \left[ \begin{matrix} \alpha & 0 & c_x & 0\\ 0 & \beta & c_y & 0 \\ 0 & 0 & 1 &0 \end{matrix} \right]^{-1} \left[ \begin{matrix} u \\ v \\ 1 \end{matrix} \right]\]多线程
- 一方面,通过search_object,主动更新目标物体的坐标信息
- 另一方面,通过第二线程进行定时更新环境描述,这样可以让机器人意识到所拿的物体掉了,或者同时移动了多个物体
threading
Thread 实例化时需要接收 target,args(kwargs)两个参数。
target 用于接收需要使用多线程调用的对象。
args 或 kwargs 用于接收调用对象的需要用到的参数,args接收tuple,kwargs接收dict。
start() 是方法用来启动线程的执行。
join() 方法是一种自旋锁,它用来等待线程终止。也可以提供超时的时间,当线程运行达到超时时间后结束线程,如join(500),500毫秒后结束线程运行。
  def main():
    # 创建 Thread 实例
    t1 = MyThread(func, (1, 1))
    t2 = MyThread(func, (2, 2))
    # 启动线程运行
    t1.start()
    t2.start()
    # 等待所有线程执行完毕
    t1.join()
    t2.join()
lock.acquire() 获得锁后线程程将一直执行不会中断,直到该线程 lock.release( )释放锁后线程才有可能被释放
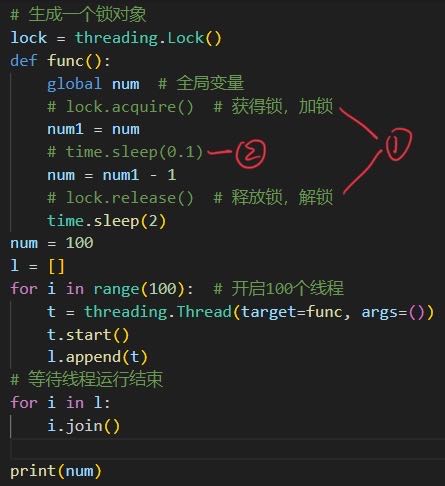
- 如果1,2都在 num=0
- 如果1在,2不在 num=0
- 如果1不在,2在 num=99
- 如果1,2都不在 num=0
参考链接
https://zhuanlan.zhihu.com/p/94344847
如何在两个py文件中共享同一个变量
方法
- 有一种方式是在A定义,在B import。这种方式,如果仅存在B import A ,那没问题。但是如果A又存在import B则会报错,原因是出现循环调用。
- 通过第三个文件,以类变量的方式,实现共享
参考链接
https://zhuanlan.zhihu.com/p/43275915
VOYAGER
Automatic Curriculum Skill Library
- 环境反馈
- 代码错误
- 自动验证
LangChain
加载文件 -> 读取文本 -> 文本分割 -> 文本向量化 -> 问句向量化 -> 在文本向量中匹配出与问句向量最相似的 top k个 -> 匹配出的文本作为上下文和问题一起添加到 prompt中 -> 提交给 LLM生成回答 基于LLM+向量数据库构建垂类行业知识库的两种方案